
Marquetry Veneer Lid Keepsake Box

This keepsake box is made with a hardwood marquetry veneer and has a Dark Walnut shell.
Tools & Materials:
Wood Glue https://amzn.to/3dVtxsu
CA Glue: https://amzn.to/305Vfuj
Delta 36-725 Table Saw: https://amzn.to/3reIucP
Miter Saw: https://amzn.to/307gWtW
DEWALT Cordless Drill: https://amzn.to/3rsJ71T
Belt Sander: https://amzn.to/3mIXdNg
Wipe On Poly: https://amzn.to/3wlZuBm
F-Clamps: https://amzn.to/2ZXSYV9
Jointer: https://amzn.to/3GWiJ9o
Random Orbital Sander: https://amzn.to/30lk9tN
Strap Clamp: https://amzn.to/3x4kKvK
Planer: https://amzn.to/3kYtP4l
Miter Gauge: https://amzn.to/3kX5yM2


I start with some Dark Walnut and use my table saw to rough-cut re-saw the piece in half.

Since the table saw blade didn’t reach the full height of the piece, I finish the re-saw cut on my band saw.

I use my planer to remove the small strip in the middle as well as getting both pieces of walnut to uniform thickness.


I use my miter gauge to square up the ends of the walnut pieces as well as cut the side and back pieces of the box.

I now tilt my table saw blade to 45-degrees and cut a mitered angle on each side of the side pieces of the box.

I now use my laser cutter to cut out hardwood pieces of veneer in the patterns I made that will make up the final design veneer for the lid.

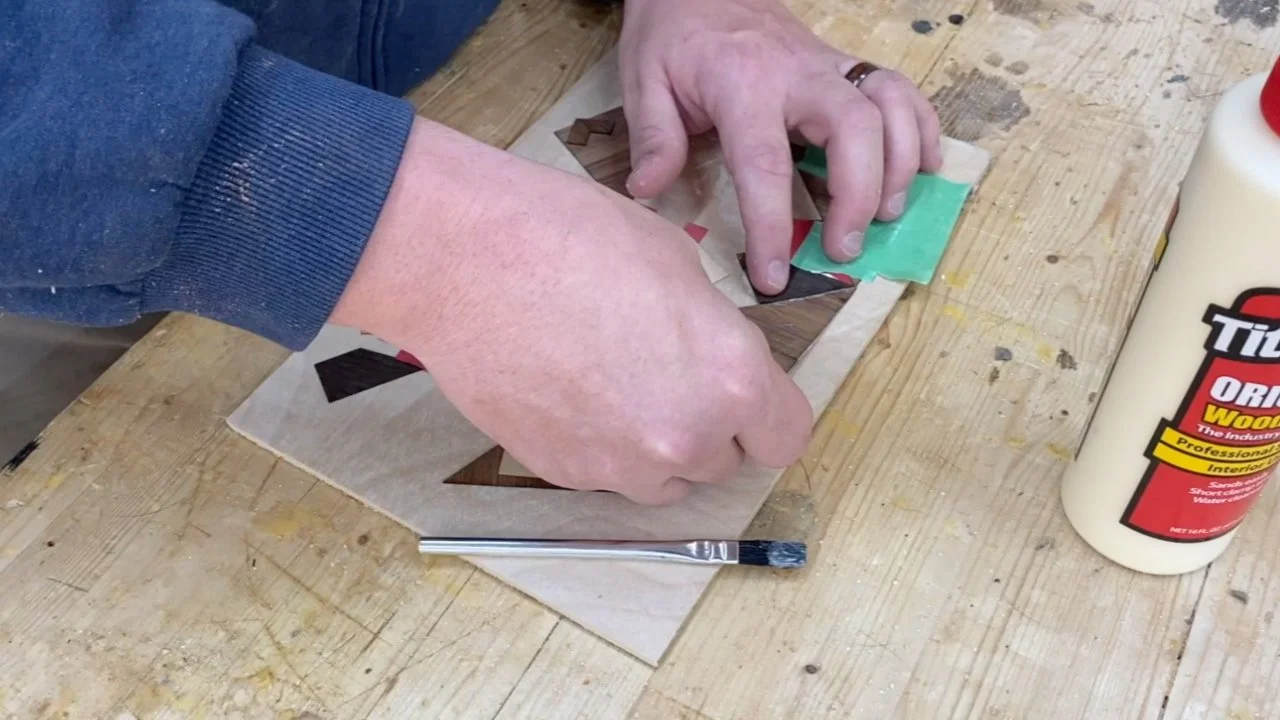

I spread wood glue on the back of the veneer pieces and begin gluing them to a piece of 1/4” Maple plywood. As I go, I use green painter’s tape to hold the pieces in place and prevent them from lifting up.

I now place the glue up between some dead-flat pieces of wood, and then into clamps to let dry.


I now cut the plywood to the exact size of the veneer overlay and give it a light sanding to clean up the veneer.


I now apply glue to another piece of 1/4” plywood and glue a dark walnut veneer in place and let dry in clamps. This will be the bottom of the lid.

Once the glue is dry, I use a sharp knife to trim the walnut veneer flush to the plywood.


I set my table saw blade height to 1/4” inch and cut a dado in the walnut box pieces on the inside face and clean up the dado cut. These slots will allow the lid and bottom pieces of plywood to fit into place.


I apply some blue painter’s tape to each edge of walnut where they adjoin to the next piece. These pieces of tape will act as temporary clamps when I begin the glue up. I give the inside faces of the box a quick sanding as these won’t be easily accessible after glue up.


I apply tape at each of the joint edges of the pieces and trim the tape flush to the edges. This will prevent glue squeeze out from being stuck on the wood.


I now apply wood glue in all joints and dados and spread using an acid brush.

I slide the top and bottom pieces of plywood in place and close up the side piece to enclose the box. I put everything into clamps and let dry.


Once dry, I cut the top off the box. This will make the lid.


I peel away the painter’s tape from the inside corners and finely clean up with a small scraper as needed.


I now sand the entire box. I start with 60-grit, work my way through the grits, up to 220-grit.

For alignment purposes when installing hinges, I temporarily clamp the lid back onto the box.

I pre-drill and install small screws with hinges on the back of the box where the lid and box shell meet.

I use my spindle sander to make a notch in the front face of the box. This depression in the front will act as a finger hold for opening the box lid.


I trim some leather to size and glue it in the bottom of the box, suede size up.

I apply 2 coats of wipe on poly, and this project is now complete!


